<body><script type="text/javascript"> function setAttributeOnload(object, attribute, val) { if(window.addEventListener) { window.addEventListener('load', function(){ object[attribute] = val; }, false); } else { window.attachEvent('onload', function(){ object[attribute] = val; }); } } </script> <div id="navbar-iframe-container"></div> <script type="text/javascript" src="https://apis.google.com/js/platform.js"></script> <script type="text/javascript"> gapi.load("gapi.iframes:gapi.iframes.style.bubble", function() { if (gapi.iframes && gapi.iframes.getContext) { gapi.iframes.getContext().openChild({ url: 'https://www.blogger.com/navbar.g?targetBlogID\x3d34110439\x26blogName\x3dFree+Gardening+Tips\x26publishMode\x3dPUBLISH_MODE_BLOGSPOT\x26navbarType\x3dBLUE\x26layoutType\x3dCLASSIC\x26searchRoot\x3dhttps://e-gardening.blogspot.com/search\x26blogLocale\x3den_US\x26v\x3d2\x26homepageUrl\x3dhttp://e-gardening.blogspot.com/\x26vt\x3d4827491973097366163', where: document.getElementById("navbar-iframe-container"), id: "navbar-iframe" }); } }); </script>

Free Gardening Tips

Free Gardening Tips...

The Beauty Of Iron Arbors

Saturday, September 23, 2006

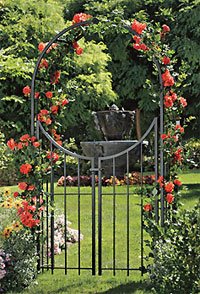
A metal arbor can be used as a focal point for any garden. They can be constructed from almost any malleable metal, but the most common ones are wrought iron arbors. The intricacy of the wrought ironwork can be extremely simple, or incredibly complex. There really is one to suit any taste and pocket.

The majority of metal arbors are used to encourage climbing plants to form a shaded area. Many people install an iron arbor and plant climbing rose bushes all around the closed areas to form a wonderfully fragrant and shaded seating area. A metal arbor traditionally has only one open side, unlike a pergola or archway. That is why it is more suited for use as a shaded seating area.

Iron arbors, or any type of metal arbor, are extremely heavy constructions. They are usually set in concrete and are seldom repositioned. It is not very practical to set a metal arbor on soft ground or grass. The wrought iron arbor is likely to sink into the surface. For the same reason, metal arbors are not often moved. There is a lot of effort required in changing the position of an established iron arbor so it is worth planning its location carefully.

The variety of styles and sizes of metal arbors that are available means that the prices vary dramatically, too. The cheapest ones are under $100, but there is no limit to how much the most expensive might be. Many wrought iron arbors are handcrafted, which adds to the cost, but ensures that it is unlike any other metal arbor. The length of time that a commissioned iron arbor will take to finish also varies with the intricacy of the metalwork involved.

Caring for an iron arbor really depends on personal preference. If you want your metal arbor to be gleaming and new for life, it will need rust treatments and repainting when appropriate. However, many owners of metal arbors prefer to leave it to the elements. This produces a lovely rusted antique look to the iron arbor. Of course, if you are encouraging climbing shrubs to cover the metal arbor then you will not be able to, or want to, perform any maintenance on the iron arbor itself. It is possible to buy iron arbors that have come from other gardens and have already acquired the weathered appearance, but these are few and far between.

Creating a metal arbor is not something that the average DIY enthusiast is likely to be able to do. The skills involved are metalwork and welding, at the very least. The most ornate of wrought iron arbors can only be produced by skilled metalworkers and craftsmen. The most beautiful metal arbors are those that have been in situ for a number of years and have fragrant roses entwined in their intricate ironwork. These iron arbors can give the owner a truly calming place of refuge from the hustle and bustle of today.

Are you Adding a Deck?

Friday, September 22, 2006

A deck is described as a wooden platform constructed above ground level and is connected to the main part of the house. It is usually surrounded by railings for the safety of the occupants. To access the deck, one must pass through the doors located in the main house or by stairs from the grounds. To control the flood of sunlight, decks may be covered by canopies or light roofing.

A homeowner who is considering improving his home may decide on building a deck that extends outdoors. Decks are considered to be a good investment for the house, it will generally raise its overall value. It will also improve the home aesthetically. Choices available for deck improvement and construction have risen considerably since more and more homeowners are getting interested in building decks for their homes.

There are several factors to consider in building house decks. Some of them are:

1. Location of the deck in the house

Spaces for decks should be designed like a regular room. The parameter of the deck should be kept out of the windows by at least two feet. If the house is located in the country where snowfall occurs, it is best to decrease the elevation of the deck from the threshold of the door. Decks should be built lower than these following problem areas: windows located below the deck, water spigots, down spouts and dryer vents. Doing so will save homeowners a lot of money.

Ideally, the realtor should include a copy of the site or plan of the house to the homeowner upon purchase, because it will be needed when he decides to build extensions on the main house. The plan will show details where not to build in excess of specific parameters of the building.

In laying down the layout of the deck, it is necessary to consider that almost all decks are not in symmetry to the back part of the house.

2. Main use for the deck and the amount of room needed

Most homeowners utilize their decks for entertaining or dining outside. Nowadays, additions such as outdoor kitchens, hot tubs, Jacuzzis and gazebos are becoming popular choices. Screening the whole area might be suited for health conscious occupants.

3. Specific area where the dining will be held

Usually, a slight elevation or an octagon is built on the deck to keep the dining table off the main floor.

4. Need of the homeowners for privacy from neighbors and the main street

Walls can be offered by the builders of the deck to afford homeowners a feeling of privacy, These walls should be limited to the sides of the decks so they won't feel too caged in.

5. Means to get on and off the deck area

The most likely area where one can enter the deck will be the side of house that is used to access the backyard. Entrances should be kept near the house itself to save space. There are certain regulations from the local building department when it comes to building stairs. A midway landing should be considered if there is a second story deck, in order to prevent injuries.

6. Placement of the grill

Grills should be placed near the kitchen door but not right next to the house itself. To save homeowners from frequent propane tank refills, a gas line under the deck should be installed permanently. The builder should then save a space for food preparation.

7. Need for shade

An awning that is custom-made can be installed over the deck to provide shade, but for homeowners on a budget, an arbor or Pergola can be built on the design of the deck. For total coverage, one should consider putting up roof over the deck, or have screens installed.

8. Preference for railings

In most areas in the U.S., any deck that is higher than 18" off the ground requires railing. A composite plastic lumber is recommended for those who prefer to have a seating constructed into the deck design. Doing this will prevent the warping and splintering that usually occurs after a long period of time.

All homeowners would like to have a picture-perfect house that will provide safety and comfort for their families. Building decks are a great way to beautify and add value to the home.

13 Master Tips to Winterize your Lawnmower

Thursday, September 21, 2006

The article gives you systematic instructions for making sure that your lawn mower is usable when the spring arrives and you require your lawn mower once again. If you do not take these minor precautions, the left over fuel in carburetor will make your lawn mower unusable at the end of winter.

Protect Your investment

After you rake out all the leaves, do not relax. Remember Robert Frost. There are miles to go before you sleep and miles (well not exactly) to go before your lawn mower is allowed to sleep. Unless you do it, your lawn mower might be put to a longer sleep. It may not wake up when winter goes away, and when you need your lawn mower most.

The Why Of Lawn Mower Winterizing

Gasoline in the carburetor of your lawn mower, does not take kindly to lowered temperatures of winter. The gasoline gums up and when you try to restart it after the winter, there s no gasoline flow to your engine and it does not start. You will not be able to do the maintenance by yourself. You will lose time and money making the trip to your friendly neighborhood mechanic. You get all this, for not following up simple steps of winterizing your lawn mower. Avoid all this winterize your lawn mower.

The How of Lawn Mower Winterizing

There are some simple steps for winterizing your lawn mower. You can do it your self without involving any one else.

  1. The first thing to do is to remove the gasoline in the tank. This can be done by siphoning the contents in the in a plastic can. Usually a single gallon container should be sufficient.
  2. Keep the can tightly closed after decanting contents of the lawn mower. Place the can in such a way that it cannot topple over and spill the content.
  3. If you use the same grade of gasoline in your car, transfer the content to the car tank, it is much safer that way, or transfer it to winter heating system if that is possible instead of storing gasoline in a can.
  4. Run the engine until the remaining fuel is completely consumed and engine stops on its own.
  5. Drain gearbox oil and crank case oil. Dispose off the oil as per guidelines from municipal authorities for disposal of hazardous waste or hand it over to municipal authorities for doing it. NEVER, EVER, dump it in sewer or on ground.
  6. Remove the spark plug, put lubricating oil (about 50 milliliter) through the opening, and crank up the engine using the rope, so the piston and crankshaft is lubricated.
  7. Ensure that you are wearing hand gloves before you do any of the following activities and take safety precautions to avoid any injury to your hands.
  8. Turn over the engine and clean the undersides of the lawn mower to remove traces of grass, muck attached to the blades and clean the working parts of lawn mower. Remove any foreign material lodged between blade and body.
  9. With a small piece of steel wool, clean all the underside areas and remove any rest from the covers and body of the lawn mower.
  10. Apply protective solution like WD-40 to the cleaned up surfaces
  11. If required, remove, sharpen and refit the blade, and turn the lawn mower to its normal position.
  12. Change the air filter and the oil filter. If it is possible to clean the air filter, you can do so, but if it is made of paper, it must be replaced. The air filters and oil filters can also be replaced just before re-using the lawn mower, but it pays to do this while winterizing as you might forget doing so before starting.
  13. Fill up the tires with air and wheel it to its resting place for winter

Inexpensive tips to increase value of your home

Did you know that you could drastically increase the value of your home without having to invest heavily in having your home remodeled or refitted? Yes, it's possible! And you won't even have to spend as much just to make it happen!

If you are selling your home, getting a good value for it could prove troublesome. But before you throw in the towel and sell your home for a price way below your expectations, you could try doing some inexpensive renovations to increase your home's value up to 20%. That's not a bad figure, is it?

Here is a brief walkthrough of the steps you can undertake to make your home worth much more that it is today.

The Kitchen: Bigger is Better The kitchen is one of the critical areas to address in your efforts to increase your home's worth. Homebuyers are looking for spacious kitchens that are clean, in good repair and have the necessary furnishings for working.

To make the kitchen look more spacious, try installing lights that will make it look brighter. You could also redo the windows to remove clutter and make it spill in more light. This will have the effect of making the kitchen look bigger. Make sure the floorings and the table tops are in good repair. If it is not beyond your budget you could even replace the current flooring with stone or tile, which is a lot better than linoleum that cracks and tears.

Keep the kitchen in good repair. It doesn't cost much to have scratches and bumps fixed. If you have busted fixtures or electrical outlets, have them repaired with good materials.

A paint job will do wonders not just for your kitchen but for the whole home. So consider adding a good layer of paint on your home.

The Yard Simple gardening would do much to make your home more appealing. Keeping the yard in order, and tending to the garden would result more in a yard that would most likely attract buyers.

To stress the significance of a good yard, mature trees will typically add about $1000 to the value of your home. So imagine the impact of a well-tended garden to the value of your home!

The Living Room Like the kitchen, living rooms must give the impression of space. Some people do so by installing mirrors. However, this technique is also suited to the bedroom. The little repairs - like light bulbs and electrical outlets.

Make sure the living room is airy, a coating of light colored paint, installation of good lamps, and a general cleanliness of the living room will contribute much to this effect.

Bedroom Like the other rooms, the bedroom has to be particularly spacious, airy and bright. Mirrors are particularly effective at accomplishing this effect. Most five-star hotels have to project an impression of space, and they employ this technique to its full effect.

Make sure the rooms have a sufficient number of electrical outlets. The flexibility this offers will add much to the value of your home.

If you plan to install new surfaces, you might also want to consider using natural materials such as stone, marble, quality wood, and others. Studies have shown that many people react favorably to these materials. They also add a feeling of cleanliness to the rooms. Make the cabinets and closets as large as possible without making the rooms they are in look cramped, you may have to employ a few illusionary tricks here but the results are astounding.

Bathrooms Use fluorescent lighting instead of incandescent lighting to provide your bathrooms with a light feel. Installing inexpensive amenities to your bathroom like towel holders, racks, shower curtains, shower fixtures and other will enhance the appearance and appeal of your home.

You can mix, match and experiment with the tips given here. The principle of the whole is that you should make your home look spacious, airy, and light. You should also make sure your home looks different from the other homes in your neighborhood. If you can one up their amenities, then well and good! There are other tricks and illusions you could employ to achieve this - tricks that do not have to be expensive at all! So go ahead give your home a good look and start increasing its value today!

How Green Is Your Garden?

Canadians love their gardens - whether that means a patch of grass and a few sturdy shrubs by the deck, or a full-scale, blowsy English garden of roses, perennials and vegetables. Our little patches of green tend to be our personal sanctuaries and play spaces - away from the stresses of the world.

Well, for our gardens to be our sanctuaries, it would be best if they were health-inducing - and that means eco-friendly.

Here's some tips for "green" landscaping to improve your outdoor living this summer:

Begin With The Trees

Your trees are your best landscaping asset. Deciduous trees let winter sun into your house when you need it most, and shield you from the sweltering rays of summer. If your house is blessed with shade, you're already a leafy 10 degrees cooler than properties exposed to full sun. Mature trees provide the best air conditioning possible -- clean, free, and majestic! Evergreens planted on the north side of your home will help stave off the winter chill. There are other important health benefits to trees, too: all types of trees will clean the air around you. It's no surprise that many homeowners are paying big bucks for big trees. But if you start planting now, before you know it (with patience and minimal care). you too can enjoy the many benefits that trees freely offer.

Birds And Bees

Butterflies and ladybugs too. You want to attract all sorts of good creatures to your garden for pest control. Birds love thick shrubbery, shallow birdbaths, native plantings, and fruit, nut and seed-bearing plants. They also love to have a little trickle of water. A small pump will help create the best effect: the slightest stream of water flowing into a shallow plate or rock depression.

Provide butterflies with sheltered sunny spots filled with brightly coloured blooms, and a flat warm rock for butterfly sunbathing. Bees love nectar-producing flowers, ladybugs love Queen Anne's Lace, and all of these treasures thrive in a chemical free environment.

These are the creatures that will help establish a healthy, happy garden - and protect your plants from the nasty pests.

Go Native

Nurseries offering indigenous plants are springing up everywhere now, making it easier for you to find native plants. There are all kinds of reasons for showcasing hardy native plantings in your garden; they are generally pest and disease free, resistant to drought, and attractive to beneficial wildlife.

Queen Anne's Lace, tansy, all sorts of daisies and lilies - the roll call of our native plants is impressively long and beautiful.

Roll Out The Barrel

We're talking rain barrels here -- ideally several for maximum water collection. The volume of water captured after an even seemingly brief rainfall will surprise you. Your plants will be happier with warm untreated water instead of the freezing cold chlorinated water that comes out of your garden hoses -- and you'll save on your water bill too.

Black gold

Start composting now and by next year you will have the most amazingly rich black stuff to sprinkle onto your lawn and flowerbeds. Many communities offer plastic compost barrels, but it is more efficient (and aesthetically pleasing) to build a wooden three-solid-sided unit with a slatted moveable front piece.

Just remember not to put in any animal by-products -- most kitchen and garden waste (not weeds) is acceptable. Keep your compost pile slightly moist (positioning it in a shaded spot helps) and poke a stick in it once in a while. That's it.

Acceptable pest and weed control

Synthetic garden chemicals do your garden no favours - upsetting the balance of healthy soil, earthworms, good insects, birds and other creatures. Declare a no-chemical season in your garden. Kill weeds with vinegar, or a dose of boiling water. Use soapy sprays to control aphids, and diatomaceous earth to stop slugs.

Put up a bat box; a bat will eat thousands of mosquitoes, and don't deserve their Halloween-y reputation. Garden-friendly insects such as ladybugs and praying mantis will patrol for a range of problem insects. Physical trapping is also good (i.e. dishes of beer for slugs etc.) Don't hesitate to use the good old methods of hosing off, and squashing too!

Mr. Toad

A clay toad-house or other cool spot may attract a toad: one of your garden's best friends.

Push mower renaissance

Remember the delightful "clackety" sound of your grandfather's old push mower? Cancel your gym membership for the summer: low-tech and clean, push mowers cut your grass efficiently, quietly, and give you a bit of a workout too.

Lawnmower Battery Buying Guide

Wednesday, September 20, 2006

When you own a battery powered lawn mower, you will want to pay close attention to the lawn mower batteries you purchase. Therefore, the first thing you will need to do is understand about all the different types of lawnmower batteries that are available and which ones you should be buying.

There are two general types of lawnmower batteries available for lawn mowers, these are the nickel cadmium and the lead acid batteries. Each have their advantages, however, many people are turning to nickel cadmium batteries because they are environmentally friendly and provide for better performance. All lawnmower batteries are rechargeable, however, they do not have unlimited life, they will have to be replaced occasionally. If you find that the mower is running strangely, or have troubles starting it up, it may be time to replace look for lawnmower batteries. There are two different types of batteries used in a lawn mower, 12-volt, and 6-volt. To find which type of battery you need for your lawnmower, the best thing to do is refer to your owners manual.

When it comes to lawnmower batteries, some of the most popular brands are snapper and Toro. Because battery powered lawnmowers comes in several styles such as push behind and riding lawnmowers, it is essential that you understand which batteries work well with your specific lawnmower. People choose battery powered lawnmower for a variety of different reasons. One such reason is the money saved when compared to the cost of gas-powered lawnmowers. With a battery, you can recharge it and get many uses out of it. With a gas-powered lawnmower, you have to constantly purchase gasoline to mow your yard and if you have a large yard, that could prove to be a costly task. Another reason for the popularity of a battery powered lawnmower, is that they are typically quieter and much more economical. Of course, as with anything, there are some disadvantages, such as the battery running dead before you are finished, or the amount of lawn it can mow with one charge.

What is great about lawnmower batteries is that you can find them almost anywhere, such as outlet stores, department stores, specialty stores, or even various places online. When looking online for a lawnmower battery, make sure that you only buy the battery from a reputable company.

Talk to your friends and family to determine where they buy their batteries from and who they would recommend. Make sure the battery comes with some form of warranty to protect you from a bad investment and that the dealer knows what they are talking about when making recommendations.

Perennials for your Garden - The Low Maintenance Choice

Perennials are plants and flowers that will stay in your garden for more than one gardening season. Some perennials will bloom for up to three years, and others will bloom for longer. One of the best things about perennials is that they are very low maintenance, which makes them popular choices for a lot of people. Annuals require much more care and tending to. If you are looking for a simple garden that doesn't require much time and attention, try planting perennials. When you choose perennials carefully and plan their planting, they will last for many years.

When you plant perennials in your garden, don't expect to see much in the first year. During this first growing season, the perennials are getting used to their new environment. Some perennials will produce new blooms in the first year, but some won't have any progress until the second year. The second year for perennials is often the most dramatic. During this growing season, perennial plants and flowers start to fill out and take hold of their environment.

When you plant perennials, you need to pay careful attention to soil quality, water availability and sunlight. These factors can all affect the growth and longevity of your perennials. During your planning, make sure to plant your perennials with plenty of space for them to grow. Make sure not to put them too close together because you may have to move them in the future. Although this leaves some bare spots in your garden, it is important to leave room.

If you are concerned about the sparse look of your perennial garden in the first year, try planting annuals in the spaces between the perennials. The annual flowers will add color and vibrancy to your garden, but won't be in the way of the growth of your perennials. Annual plants and flowers grow and bloom for just one growing season, but they do bloom quickly and have an instant gratification factor that perennials don't offer.Technorati Profile

Indoor Gardening

Tuesday, September 19, 2006

If you're living in the middle of the Amazon jungle, the last thing I would recommend for you to do is try your hand at indoor gardening. After all, why try to compete with mother nature and come out looking like an amateur? But if, like most of the population of the western world you don't actually live at the foot of a rain forest then I would really recommend looking into indoor gardening. As a jungle substitute of course.

Why would you go for an indoor garden - as opposed to an outdoor one of course? The reasons are pretty simple really. You don't need to get too mucky grubbing around on your hands and feet in the dirt. You'll almost never need to brave the harsher weather elements that nature will throw at you for trying to compete with her. It will make your house look nice, and you feel good. And ultimately in the grand scheme of things, it's good for you.

It's difficult to imagine how indoor gardening could be good for you, but really it has nothing to do with the gardening itself, more with the plants instead. If you hark back to the good old days of high school and peer pressure, you might just remember vaguely hearing something in science class about plants and photo-something-or-other.

To refresh your memory, it's a procedure called photosynthesis, where plants remove carbon dioxide from the air, and release oxygen into it instead, thereby removing pollutants from our environment. If you're living in a jungle there's not too much of a problem with that, but living as we are in our singular little houses, indoor plants are the next best thing. Thus the indoor gardening.

When planning your lovely miniature rainforest - substitute 'indoor garden' - you have a variety of stunning plant options to choose from. Ones that the outdoor gardner might not be privy to. I won't go into a list of possible indoor plants right now as the list is longer than my arm, but if you are interested I would suggest you take a look around in your local plant nursery.

You'll get a good idea of what types of plants there are for you to choose from, and what types are a no, no. They just won't grow indoors! You'll also find with indoor gardening that some plants can be temperamental and will flat out refuse to grow anywhere within a walled-in and roofed area! A simple and easy place to start with would be try your hand at herb gardening. Simple to grow, useful in the kitchen, and best of all not the prima donna type.

Gardening, of any kind, just doesn't get any better than indoor gardening, especially if you're not an outdoorsy type of person and don't want a close encounter with the wormy kind. Or any other type of crawly insect that resides in your outdoor garden, not your indoor garden. The benefits of indoor gardening just keep growing!

Herb Gardening

When you go to the supermarket you can see fresh herbs for sale. These same herbs can be grown in your garden with a minimal amount of trouble. You can grow them from cuttings or seeds. You can divide the heavy growing herbs and plant new herb plants. Whatever format that you decide to use, herb gardening adds zest to your world.

Herbs are annuals, biennials and perennial plants. Herbs like Basil, Coriander and Dill are annuals that bloom for one season only and then die. Caraway and parsley are biennials that live for two seasons and bloom only in the second season. Perennials like chives, fennel, mint and tarragon 'die' over winter and then blossom each season once the plant has established itself.

Herbs need to be planted in a 20 by 4 foot garden space. In this garden, you can have separate plots for each type of herb. This mini plot is a 12 by 18 inch herb garden. With the many herbs that are being used, colorful and frequently used herbs can be planted around the borders of your plot. Parsley and Purple Basil are examples of colorful border herb gardening.

For your herb garden to thrive the soil should not be very wet. Herbs do not grow in wet soil. To make your herb plot well drained, remove about 15 to 18 inches depth of soil. To the bottom of the hole add some crushed stone or other material that is similar to the stones.

A compost and sand mixture added to the soil will lighten the soil's texture making it easier for the water to seep through the soil and drain away. Hummus will enrich the nutrients within the soil and restore the soil's Ph level. Then refill the hole higher than it was originally.

The herbs can be planted in the ground late winter. Herb gardening requires that you first grow them indoors in shallow trays. The herb seeds must not be covered with a thick coating of soil. The soil needs to be light and well drained. This type of soil texture will ensure that your herb gardening gets off to good start.

Once your herbs are planted outdoors there are a few insects that can attack the plants. Aphids like anise, caraway, dill and fennel herbs. The red mite spider attacks low growing herbs. Rust can be a disease-like status for mint plants.

But these minor troubles aside, herb gardening is a peaceful and intriguing activity that takes its place in history. Whether you use herbs for cooking, medicinal use or even aromatic usage, the art of herb gardening is making a comeback amongst gardeners. Join their ranks and enjoy the pleasures of using your own herbs.

Refinishing Wood Flooring

Is your wood flooring already worn out? Has it already gone through the tough tests and is now looking old and pale? It may be time to refinish your wood flooring and make it look new again.

How do you know it is time to refinish the floor? You can do this simple step. Go to the area where the floor is mostly used, your living room perhaps. Get a tablespoon of water and pour it onto the floor. If the water forms beads and can easily be wiped out, there is no need to refinish it yet. Your floor is still in good condition.

If the water that you just poured slowly seeps into the floor and creates a visible spot, it may already need refinishing touches. You may want to keep it in your to-do list and schedule a time when you can do the refinishing. However, if the water seeps in as quickly as you had poured it, then don't waste more time. Your floor definitely needs refinishing, and soon.

Refinishing your wood flooring would require equipments such as a drum sander. Other equipments may be needed for other more detailed tasks in the finishing process. You need not buy those equipments, though. These equipments are available for rent in your local home shops such as Home Depot. You can rent them on a daily or weekly basis.

Different grit papers are used in the drum sander for different floor types. The lower the grit paper number is, the coarser it is for use on more damaged woods. Once you have chosen the right grit paper, you can now start sanding the wood using the equipment. It is suggested that you do the sanding diagonally on both ways then along the grain.

Once you are done sanding the whole floor with that procedure, repeat the process again using a finer grit paper (one with a higher number). After sanding the whole floor again, you can now sand the edges using a spinner/edger machine.

Vacuuming is the next step to clean off the sand dusts. Should there be gaps present after the sanding process, fill them in using the sand dust mixed with varnish to form a paste. Then leave the floor alone for some time.

After a few hours, repeat the sanding process again, this time doing it along the grain with a much finer grit. Do this twice using the highest grit number on the last sanding. After which, vacuum the floor once more and sweep off the sanddust.

Once the floor is dust-free, it is now time to apply the coat. You would need a roller to do this. Before using the roller, make sure it is clean first using a stiff brush to remove dirt and loose hairs that might get into the finish.

The urethane coating can now be applied across the floor grain by strips. Once the whole array of strips is completed, go back to the starting strip and make sure there are no roller marks or urethane build up.

Let the first coating dry for some time. When the coat is completely dry, the next step is to sand the whole floor using an orbital sander. Vacuum and sweep the floor afterwards to remove the dust.

Finally, the second coating can now be applied using the same procedure as the first. When you do the second coating, make sure the sun doesn’t shine through the window to any part of the floor to avoid uneven marks.

Refinishing your wood flooring is relatively easy as long as you have the right equipment. The rent may be a little costly though, but not as expensive as replacing your whole floor. You can even save more doing it yourself than hiring somebody to do it for you. Also, wouldn’t you be proud to show off your work and tell your friends you did it by yourself?

Nicely finished or refinished floors make your home look more beautiful. It is also a healthy alternative than carpets. Carpets are known to cause allergies because they are difficult to clean. Having just bare, nicely finished wood flooring will help you have a healthy environment inside your own home. Dusts, pests, molds, and animal stains can easily be cleaned up as well.

Garden Plaques: Make Your Garden The Stuff of Angelic Dreams

Monday, September 18, 2006

Angel 13Garden plaques are tablets, usually made out of wood and either suspended, appended to a vertical surface like a wall, or posted like a sign out of the ground. Garden plaques can either be small or very long, and beautiful, functional, or both.

Based on the situation, garden plaques have a selection of usages: identification, commemoration, or decorative. An example of an ID plaque would be a family marker, such as The Smiths, to accompany an address or erected out front of home.

The brief mentions one finds at museums are also ID plaques, although these are not actually garden plaques. Commemorative plaques, though, are more plenty. A headstone and historical marker are examples of this (garden plaques need not only be made of wood.

Headstones are found in cemeteries, which are mostly treated like gardens). Decorative plaques, as those seen in a garden, would be markers with flowers painted on them to contribute pizazz to the scene.

Garden plaques can be made in a selection of shapes and sizes, depending on the length of the message and the degree of ornamentation integrated on them. The aforementioned headstone would have the deceases name, dates, possible quote, and even the addition of angelic iconography.

These stones would naturally be bigger than a headstone inserted in the floor and bearing only a name and dates. Some headstones are round while others are rectangular, square, or cross-shaped. Family markers are the same way.

Garden plaques can even be in the form of 3-dimensional icons, such as animals, mythical or cultural designs, cosmological bodies (moon, sun, stars, etc.), or everyday items, like hearts, ribbons, books, even cars. When it comes to the possible style of garden plaques, the imagination is the limit!

Garden plaques come in an array of prices. Plaquemaker.com offers plaques starting at $14.00 for one. The more plaques bought, the cheaper each plaque is. $4.00 is the cheapest for one in a package having a 101-to-250 quantity.

A variety of garden plaques offered here, with descriptions made in at least ten different possible colors, have designs that are based on the customers personal choice.

For those interested, these are fun to have and to look at. They spice up the garden, the home, or wherever they are placed. Garden plaques are special and always en vogue!

Garden Plaques have an incredible ability to "take you there", whether it's a fairy tale, or a sense of tranquility, these items certainly have a spirit all unto themselves!

Gardening Equipment

Gardening equipment per se, is what every gardener needs. At least that's what we all say when we rush off to buy that handy new extra-light shovel that just went on sale! However, not every gardener has all the tools, or even the right ones necessary, and most gardeners will just make do with what they have. Most of the time improvisation is the key.

But if gardening is your game, then you will at least have some of the more basic gardening equipment that is needed to maintain your garden. Namely, a hoe, a shovel, and a rake come to mind offhandedly. There is also naturally other gardening equipment that is equally important, and I know that I simply can't be without my pruning scissors.

As the years wore on I found that I had indeed collected many an essential piece of gardening equipment, and now find to my dismay that my shed is full to overflowing with tools. The best ones that I have though are a very old pair of comfortable gardening gloves, and my trusty, old kitchen knife that I had brought out one day, and just never replaced.

When I can't find my pruning scissors, my kitchen knife takes its place and acts as a pruning knife instead. If I can't be bothered to find my hoe, or shovel, I just use the tip of the knife to accomplish what I want. Then of course there are the times that I just can't be bothered with even that, and use my nicely gloved hands instead to loosen the soil, or pull up weeds.

It probably sounds like a fairly sloppy way to go about your gardening, but every dedicated gardener knows that if you're knee deep in the middle of something, the last thing you'll want to do is to interrupt your work to fetch the proper gardening equipment from your shed.

However, that said, some jobs are easier with the proper equipment at hand, and it is worth your while to go and fetch it from whatever nook or corner that you stuffed it into. One of my favorite pieces of gardening equipment is the garden claw.

With two varieties available, one for standing work, and for closer work and therefore fitting in your hand, the garden claw makes your life easier. Stick the claw in the ground, give it a simple twist with your wrist, and pull out. It loosens soil easily, and as an added benefit you get to pull out your weeds with less hassle.

Really the key thing to remember about gardening equipment is that although we might want it, we don't always need it. Besides it's always a good thing not to get too attached to your gardening equipment, it makes life easier if you're not always trotting back and forth between your work patch and the shed. Ultimately you'd not get too much done, (unless you're using your handy garden claw!).

Pest control for perennials

Perennials are a great choice for any garden, with their great variety of colors, shapes and sizes. Perennials also have another important advantage over other types of flowers. That is, unlike annuals, which must be replanted year after year, perennials, by their very nature, are able to regenerate from year to year. This means you are free to plant once and enjoy many seasons of beautiful blooms.

While the actual longevity of perennials varies from variety to variety, some types, such as peonies, have been known to last for decades once planted.

This longevity, however, can come at a price, and one of those disadvantages is that perennials need more care when it comes to maintenance, weeding and pest control. Unlike the annual garden, which is dug up and restarted each year, perennials remain in the ground over the winter, and this can make them more prone to common garden pests than other types of plants.

One of the best defenses against pests in the perennial garden is a healthy and vigorous selection of plants. The healthier the plants in the garden the better they will be at fighting off common pests and garden infections. Plants that are well cared for and vigorous will be much less susceptible to damage by insects and other pests.

The vigilance of the gardener is another great tool in preventing pest infestations from getting out of control. A good gardener is constantly on the lookout for early signs of problems, such as holes in the leaves, marks or wounds on the stems, and other signs of pest problems.

Having a good guide to common garden pests and diseases is a good idea as well, since it can sometimes be difficult for the untrained eye to tell exactly what the problem is. Diagnosing the problem is the best way to cure it quickly, before it can spread.

Gardeners have a choice when it comes to pest control in their gardens. There are of course a great many chemical pesticides on the market, but there are a number of natural methods as well. Many experienced gardeners prefer to start out with the natural approach first, and move onto chemical methods only when natural attempts have failed.

One great natural pest control approach is to use beneficial insects to control harmful pests. Many garden supply stores sell these beneficial insects, and it is usually easy to seed a garden with these insects and get them to stay and remove harmful pests.

In addition, aphids can often be controlled simply by spraying plants with a very dilute mixture of soapy water, followed by a rinse of clean water. This method often works just as well, and is considerably less expensive, than chemical methods, and it has proven effective even on serious aphid infestations.

Another great way to control pests is to buy pest and disease resistant varieties of plants. Many perennials have been selectively bred to be resistant to common pests and diseases. If these varieties are available it is a good idea to seek them out. Even if they are more costly up front, the money you save on pesticides and other chemicals can make them quite cost effective.

Donatello's Fountain

Donato di Niccolò di Betto Bardi, universally known as "Donatello", was born in Florence around 1385 and was laid to rest there in 1465. The powerful nature of his art made him the greatest sculptor of the early Renaissance

A fountain by Donatello, carved of granite and decorated with ornaments of marble, adorned the garden of the Medici Palace in Florence, Italy. As the most elaborate and monumental example of Florentine fountain sculpture from the entire century, this work merits special mention. The lost basin was almost certainly the one crowned by Donatello's bronze group of Judith and Holofernes before it was seized by the state in 1495 and transferred to the center of the Palazzo Vecchio. Four openings at the corners of the cushion on which the body of Holofernes rests prove that this group was designed for the decoration of a fountain.

Although Donatello chose a Biblical subject, he made use of a classical fountain motif. The water spurted from the open¬ings in the corners of the cushion below the drunken Holofernes, as from Hellenistic figures of tipsy satyrs on wineskins. The theme of intoxication was continued in a bronze relief of the triangular pedestal in three Bacchic scenes representing the vintage, a wine themed fountain spout, and a drunken revel -- all enacted by the inevitable putti. A potential water spout ap¬pears in the center of each side of the pedestal, as in the Gorgon's head on the great crater in the Bacchanal, but these "mouths," obviously designed for jets of water, were never pierced.

Conscious of the need of 360-degree treatment in a freestanding group, Donatello designed Judith and Holofernes as a pyramid which presents three distinct profiles, each corresponding to a side of the pedestal below. The triangular plan of this pedestal undoubtedly repeats the broader tri¬angle of the base of the lost cylix. The granite of which that basin was carved recurs in the balusters that frame the relief.

Adding wall fountains or outdoor garden fountains to your landscaping or garden project can be a great way to enhance your outdoor living space, even if it does not carry the impact of a Donatello piece. Historical fountains (such as those by Donatello) and water features provide inspiration for many current designers and manufacturers, so adding one of these fountains is a great way to build a connection from your home to the past. Beyond the design beauty and characteristics of garden fountains, they also add water and moisture to the surrounding environment, which can attract wildlife such as birds, and balance your local ecosystem. For instance, birds that are attracted by a fountain or birdbath can be the best defense against flying insects that bother both humans and plants.

The group of Judith and Holofernes was probably constructed about 1455, after the artist's return from Padua. The relaxed head of the Holofernes is similar to that of the Christ in his Crucifix in Saint Antonio. The compli¬cated drapery of Judith and the intensity and confusion of the bas-reliefs are also in his later vein. Moreover, the fountain was almost cer¬tainly designed for the Medici Palace, which was not finished until the year 1444, after his departure for Padua.

While you won't be adding a Donatello fountain to your garden, in a practical sense, most water fountains used in landscaping are self-contained, which means an electric fountain pump moves the water from a lower basin, up the back of the fountain, and then allows the water to spill down the facing of the waterfall. This makes them practical for the average homeowner. Nearly all these types of fountains rely on a household 110v electrical outlet nearby. Be sure the fountain pump is U.L. listed, and connected to a Ground Fault Interrupt (GFI) outlet.

Few works of art have suffered as much as the fountains of Donatello when re¬moved from their original setting. The broad base supplied by the cylix undoubtedly tended to stabilize the statue, now perched precariously upon a slender column which certainly has no connection with the original fountain.